 English
 Espaol
 Franais
 阿拉伯
阿拉伯 中文(簡)
中文(簡) Deutsch
 Italiano
 Português
 日本
日本 韓國
韓國 български
 hrvatski
 esky
esky Dansk
Dansk Nederlands
 suomi
suomi Ελληνικ
 印度
印度 norsk
norsk Polski
 Roman
Roman русский
 Svenska
 專業(yè)維修鉑金斯發(fā)動機,專業(yè)維修鉑金斯發(fā)動機技術(shù)支持,專業(yè)維修鉑金斯發(fā)動機價格規(guī)格資料查詢,專業(yè)維修鉑金斯發(fā)動機哪里有,專業(yè)維修鉑金斯發(fā)動機多少錢,專業(yè)維修鉑金斯發(fā)動機聯(lián)系電話,湖南、長沙、常德、郴州、衡陽、懷化、婁底、邵陽、湘潭、湘西、益陽、永州、岳陽、張家界、杭州/紹興、湖州、嘉興、寧波、舟山、臺州、金華、麗水、衢州、溫州

2300 Series
How to renew the fan belts
1 Remove the fan guards.
2 Remove the six bolts which secure the fan and hub assembly to the pulley and remove the assembly.
Caution: Take care during the removal of the fan; ensure that the radiator does not become damaged.
3 Loosen the belt tensioner and remove the old belts. Ensure that the grooves of the pulley are free from
grease and dirt and fit a new set of belts.
4 Fit the fan and tighten the bolts securely. Adjust the fan belts to the correct tension, as given in "How to
adjust the tension of the fan belts" on page 31, and fit the fan guards.
How to renew the alternator belt
1 Remove the fan guards.
2 Remove the six bolts which secure the fan and hub assembly to the pulley and remove the assembly.
Caution: Take care during the removal of the fan; ensure that the radiator does not become damaged.
3 Loosen the adjustment bolts to release the tension on the alternator belt and remove the old belt. Check that
the pulley grooves are clean and fit a new belt.
4 Fit the fan and tighten the bolts securely. Adjust the alternator belt to the correct tension, as given in "How
to adjust the tension of the alternator belt" on page 32, and fit the fan guards.
How to inspect the crankshaft vibration damper
The viscous damper has a weight that is located inside a case filled with fluid. The weight moves in the case
to limit torsional vibration. Inspect the damper for evidence of dents, cracks or leaks of the fluid.
Renew the damper if it is dented, cracked or leaking.
The damper is mounted on the crankshaft and is located behind the belt guard at the front of the engine. Refer
to the Workshop Manual for the correct procedure to remove and to fit the damper.
User’s Handbook, TSD3454E, Issue 2
33
This document is printed from SPI². Not for RESALE
![]()
![]()
4
2300 Series
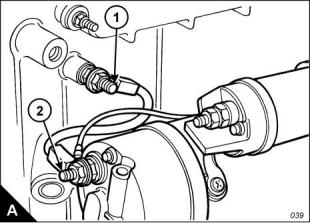
Earth stud
Inspect the wiring harness for good connections and inspect the condition of the harness. Check the tightness
of the earth stud (A1) at the periods specified in the service schedule. The earth stud is fitted below the ECM
at the left side of the crankcase. The earth strap is fitted between the earth stud and a terminal on the starter
motor (A2). For engines which have the starter motor fitted to the right side, or engines not fitted with an electric
starter motor, the earth strap is fitted between the earth stud and the negative terminal of the starter battery.
1 Disconnect the batteries before any service work is attempted.
2 Remove the nut which retains the earth strap on the earth stud (A1) and remove the earth strap.
3 Remove the washer and use a torque wrench and suitable socket to check the tightness of the earth stud.
The earth stud must be tightened to a torque of 47 Nm (35 lbf ft).
Notes:
If the earth stud is removed, the short end must be fitted into the crankcase.
If the earth strap is disconnected from the starter motor, it must be connected again and the nut which
retains it must be tightened to a torque of 30,5 +/- 3,5 Nm (22.5 +/- 2.5 lbf ft).
4 Clean the earth stud and the earth strap with a clean cloth. If the connections are corroded, clean them with
a solution of sodium bicarbonate and water.
5 Fit the washer and the earth strap. Fit the retaining nut and tighten to a torque of 47 Nm (35 lbf ft).
6 Keep the earth stud and the strap clean and coated with petroleum jelly.
7 Connect the batteries.
34
User’s Handbook, TSD3454E, Issue 2
This document is printed from SPI². Not for RESALE
![]()
![]()
![]()
![]()
4
2300 Series
Hoses and hose clips
Inspect all hoses for leaks which may be caused by:
Cracks
Softness
Loose clips
Renew hoses that are cracked or soft. Tighten any loose clips.
Check for these conditions:
End fittings that are damaged or leaking
Outer covering that is chafed or cut
Exposed wire that is used for reinforcement
Outer covering that is ballooning locally
Flexible part of the hose that is kinked or crushed
Armour that is embedded in the outer covering
To renew a hose
Warning! Take care during removal of the filler cap as the coolant system may be under pressure.
1 Stop the engine. Allow the engine to cool.
2 Loosen the filler cap of the coolant system slowly to relieve any pressure. Remove the filler cap.
Note: Drain the coolant into a suitable, clean container. The coolant can be used again.
3 Drain the coolant to a level below the hose which is to be renewed.
4 Remove the hose clips and remove the old hose.
5 Fit the new hose.
6 Fill the coolant system to the correct level with the specified coolant mixture.
7 Clean the filler cap and inspect the gaskets. Renew the filler cap if the gaskets are damaged. Fit the filler cap.
8 Start the engine. Inspect the coolant system for leaks.
User’s Handbook, TSD3454E, Issue 2
35
This document is printed from SPI². Not for RESALE
![]()
![]()
![]()
![]()
![]()
![]()
![]()
![]()
![]()
![]()
![]()
4
2300 Series
How to clean the radiator
Inspect the radiator for damaged fins, corrosion, dirt, grease, insects, leaves, oil, and other debris. Clean the
exterior of the radiator, if necessary.
Warnings!
During the use of high pressure air, wear a protective face shield and protective clothing.
Maximum air pressure at the nozzle must be less than 205 kPa (30 psi) for cleaning purposes.
Use a high pressure air jet to remove loose debris. Direct the air in the opposite direction to the fan's air flow.
Hold the nozzle approximately 6 mm (0.25 in) away from the fins. Move the air nozzle slowly in a direction that
is parallel with the tubes to remove debris from between them.
A high pressure water jet may also be used to clean the radiator. The maximum water pressure for cleaning
purposes must be less than 275 kPa (40 psi). Do not hold the nozzle too close to the radiator as the fins can
be damaged. Use pressurized water to soften mud. Clean the core from both sides.
Use a degreaser and steam for the removal of oil and grease. Clean both sides of the core. Wash the core with
detergent and hot water. Rinse thoroughly with clean water.
After the radiator has been cleaned, start the engine and run it at high idle speed. This will help to dry the core
and remove debris. Stop the engine and use a light bulb, held behind the core, to inspect for cleanliness. Clean
again, if necessary.
Inspect the fins for damage. Check the condition of the welds, the mounting brackets, the connections and
seals. Arrange for repairs as necessary.
How to inspect the engine mountings
Inspect the engine mountings. Check for damage or deterioration and check that the bolts are tightened to the
correct torque. Note that engine vibration can be caused by:
Incorrect mounting of the engine.
Deterioration of the engine mounts.
If an engine mount shows signs of deterioration, it must be renewed.
36
User’s Handbook, TSD3454E, Issue 2
This document is printed from SPI². Not for RESALE
![]()
![]()
![]()
![]()
![]()
![]()
4
2300 Series
How to drain the coolant system
Warnings!
Do not remove the coolant filler cap while the engine is still hot and the system is under pressure because
dangerous hot coolant can be discharged.
Discard used coolant in a safe place and in accordance with local regulations.
1 Stop the engine and allow the engine to cool. Loosen slowly the filler cap of the coolant system to relieve
any pressure. Remove the filler cap.
2 Open the drain valve of the coolant system (if fitted). If the coolant system is not fitted with a drain valve,
disconnect the lowest coolant hose.
Allow the coolant to drain.
How to clean the coolant system
1 Flush the coolant system with clean water.
2 Close the drain valve (if fitted), or connect the coolant hose used to drain the system.
Note: To avoid air locks, fill the coolant system no faster than 19 L (4.2 UK gal) per minute.
3 Fill the coolant system with a mixture of clean water and Holts Fast Acting Cooling System Cleaner or
equivalent. Refer to the manufacturer’s instructions. Fit the filler cap.
4 Start and run the engine at low idle speed for a minimum of 30 minutes. The coolant temperature should be
at least 82 °C (180 °F).
5 Stop the engine and allow the engine to cool. Loosen the filler cap of the coolant system slowly to relieve
any pressure. Remove the filler cap. Open the drain valve (if fitted) or disconnect the lowest coolant hose.
Allow the cleaning mixture to drain. Flush the coolant system with clean water. Close the drain valve (if fitted),
or connect the coolant hose used to drain the system.
How to fill the coolant system
1 Fill the coolant system with the correct coolant mixture, refer to "Coolant mixture" on page 49. Do not fit the
filler cap.
2 Start and run the engine at idle for 1 minute to eliminate air from the cavities of the engine block. Stop the
engine.
3 Check the coolant level. Maintain the coolant level at the bottom of the filler pipe in the expansion tank.
4 Clean the filler cap of the coolant system. Inspect the gasket on the filler cap. If the gasket is damaged,
renew the filler cap. If the gasket is not damaged, use a proprietary pressure test kit to perform a test on the
filler cap. The correct pressure for the filler cap is stamped on its face. If the filler cap does not retain the correct
pressure, fit a new filler cap.
5 Start the engine. Inspect the coolant system for leaks and for correct temperature of operation.
User’s Handbook, TSD3454E, Issue 2
37
This document is printed from SPI². Not for RESALE
![]()
![]()
![]()
![]()
4
2300 Series
How to check the tappet clearances
Tappet clearances
Inlet
0,38 +/- 0,08 mm (0.015 +/- 0.003 in)
0,76 +/- 0,08 mm (0.030 +/- 0.003 in)
Exhaust
The tappet clearance is measured between the rocker levers and the top of the valve bridge pieces. The
operation must be done with the engine cold and stopped. Refer also to "How to check/adjust the electronic
unit injectors" on page 41.
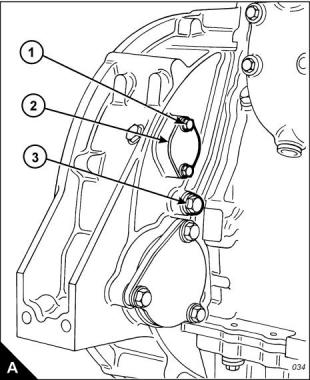
1 Remove the rocker cover.
2 Remove the top bolt (A1) from the cover (A2) on the flywheel housing and slacken the other cover bolt to
allow the cover to open. The top bolt (A1) is the timing bolt.
Caution: If a customer-fitted speed sensor is fitted to the flywheel housing, it must be removed before the
turning tool can be inserted.
3 Remove the plug (A3) from the timing bolt location in the flywheel housing and fit the timing bolt.
Note: There are two locations for the timing bolt, one at each side of the flywheel housing. Use the location
which is the most convenient.
4 Insert the engine turning tool, CH11148, into the flywheel housing through the aperture behind the cover
1
(A2). Use a / inch drive ratchet with the turning tool to rotate the engine flywheel in the normal direction of
2
rotation (anti-clockwise when viewed on the flywheel) until the timing bolt engages with the threaded hole in
the flywheel. The piston of number 1 cylinder is now at TDC (top dead centre).
Caution: If the flywheel is turned past the threaded hole, the flywheel must be turned in the opposite direction
for approximately 45 degrees and then back in the normal direction of rotation until the timing bolt engages
with the threaded hole. This is to eliminate backlash.
5 Check the inlet and exhaust valves of the number 1 cylinder. If they are fully closed the piston is on its
compression stroke and the rocker levers can be moved by hand. If the rocker levers can not be moved
because the valves are slightly open, the piston is on its exhaust stroke. If it is on its exhaust stroke, withdraw
the timing bolt and turn the flywheel a further 360 degrees in the normal direction of rotation so that the number
1 cylinder is set to TDC on its compression stroke, then insert again the timing bolt.
Continued
38
User’s Handbook, TSD3454E, Issue 2
This document is printed from SPI². Not for RESALE
![]()
![]()

4
2300 Series
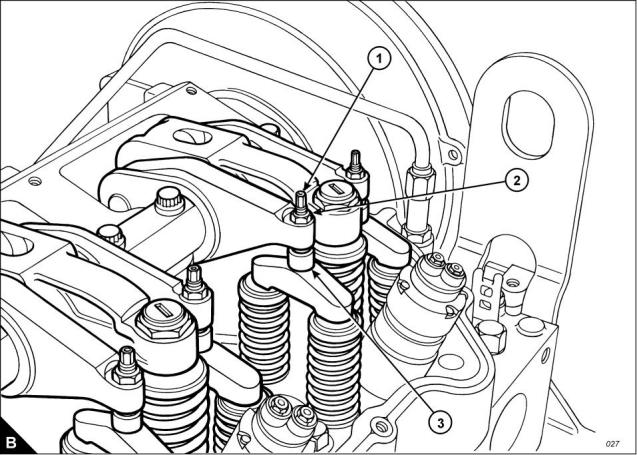
6 Before each set of tappet clearances is adjusted, ensure that the roller of the rocker lever is fully against the
camshaft lobe.
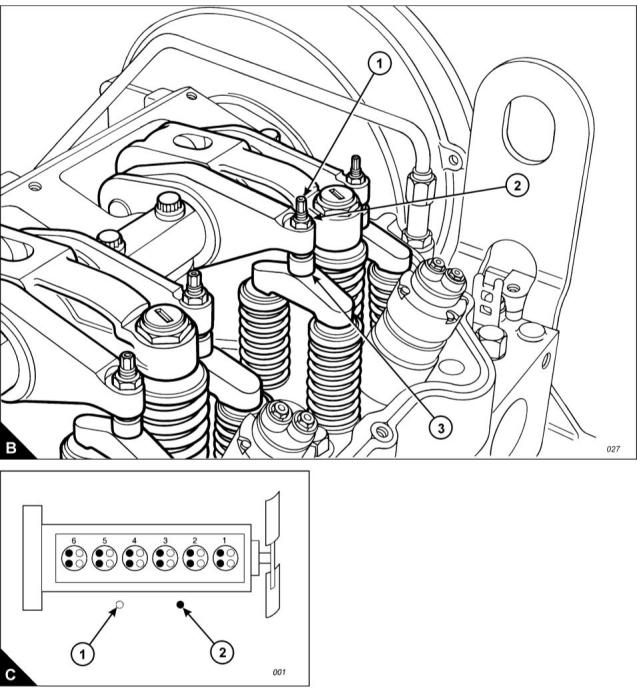
7 Use a set of feeler gauges, inserted at the position shown (B3) between the valve bridge piece and the rocker
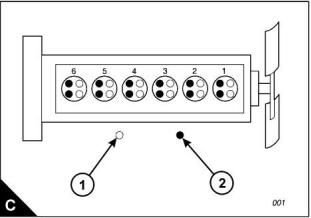
lever button, to check the tappet clearances for the inlet valves (C1) on cylinders 1, 2 and 4. Adjust the
clearances if necessary. Check the tappet clearance for the exhaust valves (C2) on cylinders 1, 3 and 5, and
adjust the clearances if necessary.
Notes:
Move each valve bridge piece before the feeler gauge is inserted to reduce the effect of the oil film.
During the procedure, ensure that the feeler gauge is fully inserted
Continued
User’s Handbook, TSD3454E, Issue 2
39
This document is printed from SPI². Not for RESALE
![]()
![]()
![]()
![]()
4
2300 Series
8 After each unit has been adjusted, tighten the lock nut (B2) of the adjustment screw (B1) to a torque of 30 +/
- 4 Nm (22 +/- 3 lbf ft).
9 Withdraw the timing bolt and rotate the flywheel by 360 degrees so that the number 6 piston is at TDC on
its compression stroke. Insert again the timing bolt into the threaded hole.
10 Check the tappet clearances for the inlet valves (C1) on cylinders 3, 5 and 6. Adjust the clearances if
necessary. Check the tappet clearances for the exhaust valves (C2) on cylinders 2, 4 and 6, and adjust the
clearances if necessary.
11 After each unit has been adjusted, tighten the lock nut of the adjustment screw to a torque of 30 +/- 4 Nm
(22 +/- 3 lbf ft).
12 Check again the tappet clearances for all six cylinders.
13 Fit the rocker cover. Remove the engine turning tool and the timing bolt and fit the cover to the flywheel
housing.
14 Fit the plug to the timing bolt location.
40
User’s Handbook, TSD3454E, Issue 2
This document is printed from SPI². Not for RESALE
![]()
![]()
4
2300 Series
How to check/adjust the electronic unit injectors
This operation should be performed at the same time as the operation to check the valve tappet clearances.
Warning! The electrical circuit for the fuel injector units operates on 110 volts. Do NOT work on the fuel injector
units unless the power supply to the ECM has been disconnected.
1 With the rocker covers removed, set the number 1 piston to TDC (top dead centre) on its compression
stroke. Check/adjust the height dimensions for the fuel injectors of cylinders 3, 5 and 6.
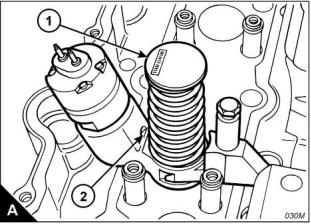
2 Use the fuel injector setting gauge, CH11149, to obtain the correct height for the fuel injector. The dimension
to be measured is from the top of the unit injector (A1) to the machined ledge on the fuel injector body (A2).
This dimension should be 78,0 +/- 0,2 mm (3.07 +/- 0.01 in). Slacken the lock nut and use the adjustment screw
of the rocker lever to obtain the correct dimension. Tighten the lock nut to a torque of 55 +/- 10 Nm (41 +/- 7
lbf ft).
3 Remove the timing bolt from the flywheel housing and rotate the flywheel by 360 degrees in the normal
direction of engine rotation until the timing bolt can be inserted into the threaded hole. This will put the number
1 piston at TDC in its exhaust stroke.
4 Check/adjust the height dimensions for the fuel injectors of cylinders 1, 2 and 4 as given in step 2.
5 When all adjustments have been made, remove the timing bolt, fit the cover to the flywheel housing, fit the
plug to the timing bolt position and fit the rocker covers.
User’s Handbook, TSD3454E, Issue 2
41
This document is printed from SPI². Not for RESALE
![]()
![]()
4
2300 Series
Engine protection devices
The engine is fitted with an electronic management unit which monitors all critical engine temperatures and
pressures and will stop the engine if a critical fault occurs.
If any of the sensors fail, the diagnostics indicator will be activated and your Perkins dealer should be contacted
so that the fault can be identified by use of the Perkins Electronic Service Tool (EST).
Visual inspection
Check visually the condition of all gauges, sensors and wiring. Look for wiring and components that are loose,
broken, or damaged. Damaged wiring or components should be repaired or renewed immediately.
42
User’s Handbook, TSD3454E, Issue 2
This document is printed from SPI². Not for RESALE
![]()
![]()
4
2300 Series
How to renew the thermostats of the coolant system
Renew the coolant thermostats at the periods given in the service schedule. This is recommended preventive
maintenance practice.
Cautions:
Failure to replace the thermostats at the periods given in the service schedule could cause severe engine
damage.
The engine MUST be operated with the thermostats installed. If a thermostat is fitted incorrectly the engine
may overheat.
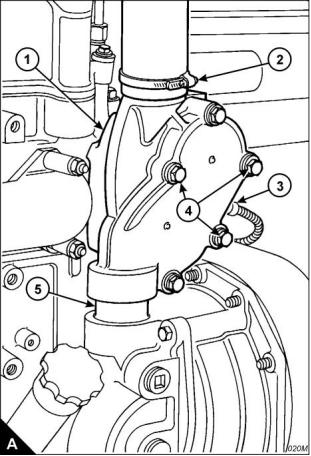
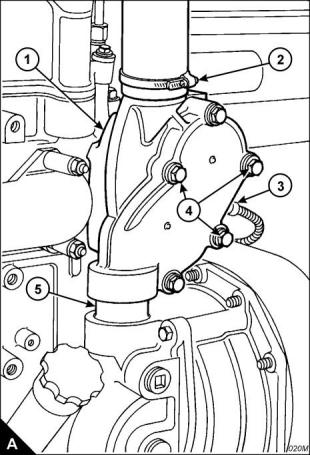
1 Drain the coolant until the level is below the thermostat housing (A1).
Caution: Certain sensors fitted to the engine have a short lead which is part of the sensor unit. For this type
of sensor ensure that the wiring harness is disconnected from the end of the lead. Do NOT attempt to remove
the lead from the sensor unit.
2 Disconnect the cable (A3) from the coolant temperature sensor.
3 Release the hose clips (A2) and disconnect the pipe and hose clip from the top of the unit.
4 Slacken all five bolts of the thermostat housing; then remove fully the three bolts (A4) which retain the
thermostat housing on the cylinder head.
5 Lift carefully the assembly to separate it from the coolant bobbin (A5) at its base.
6 Remove the two short bolts which remain, separate the two halves of the assembly and remove the
thermostats.
7 Clean thoroughly both parts of the assembly and check the condition of the lip-type seals. Renew the seals
if they are worn or damaged.
Continued
User’s Handbook, TSD3454E, Issue 2
43
This document is printed from SPI². Not for RESALE
![]()
![]()
![]()
![]()
4
2300 Series
8 Fit the new thermostats. Ensure that the new thermostats are fitted correctly. Fit a new ‘O’ ring type seal to
the groove in the thermostat housing, assemble the two halves of the unit and retain with two short bolts.
9 Ensure that the mating face on the cylinder head is clean. Fit new seals to the coolant bobbin (A5) which fits
into the base of the unit and lubricate the seals with a small amount of rubber lubricant. Fit a new ‘O’ ring type
seal to the groove in the mating face of the housing and fit the assembly over the coolant bobbin. Fit the three
bolts (A4) which retain the thermostat housing on the cylinder head and tighten fully all five bolts.
10 Connect the hose to the top of the housing and tighten the hose clip (A2).
11 Connect the cable (A3) to the coolant temperature sensor.
12 Fill the coolant system to the correct level with the approved coolant mixture.
13 Operate the engine until it reaches the normal temperature of operation and check for leaks. Stop the
engine, check the coolant level and, if necessary, add extra coolant.
Warning! Take care during removal of the filler cap as the coolant system will be under pressure.
44
User’s Handbook, TSD3454E, Issue 2
This document is printed from SPI². Not for RESALE
![]()
![]()
4
2300 Series
How to clean and to calibrate the engine speed/timing sensors
1 Disconnect the wiring harness and remove the two speed-timing sensors from the left side of the engine at
the back of the gear case.
Caution: Certain sensors fitted to the engine have a short lead which is part of the sensor unit. For this type
of sensor ensure that the wiring harness is disconnected from the end of the lead. Do NOT attempt to remove
the lead from the sensor unit.
2 Check the condition of the plastic end of the sensors for wear and/or contaminants.
3 Clean the metal shavings and other debris from the face of the sensors.
4 Fit the sensors to the correct locations and connect the wiring harness.
Note: If a new ECM unit has been fitted, or the engine gear train has been renewed or dismantled and
assembled, the engine speed/timing sensors must be calibrated. Refer to engine timing calibration in the
Diagnostic Manual.
User’s Handbook, TSD3454E, Issue 2
45
This document is printed from SPI². Not for RESALE
![]()
![]()
4
2300 Series
How to inspect the turbocharger
At the periods given in the service schedule, with the engine switched off and cool, disconnect and remove the
pipe from between the air filter and the turbocharger. Turn, rapidly, the rotor assembly of the turbocharger,
check for freedom of movement and for sounds of interference. Contact your Perkins dealer if necessary.
Caution: Failure of the turbocharger bearings can cause large amounts of oil to enter the air inlet and exhaust
systems. Loss of engine lubricant can cause serious engine damage.
Minor leakage of a turbocharger housing under extended low load operation should not cause problems unless
turbocharger bearing failure has occurred.
Caution: When a turbocharger bearing failure is accompanied by a significant loss in engine performance
(exhaust smoke or engine speed up at no load), do not continue to operate the engine until the turbocharger
has been repaired or renewed.
Deposits must not be removed from the turbine wheels nor the compressor wheels or the balance of the
assembly will be adversely affected.
Check the oil supply and drain pipes for oil leaks.
Check for air leakage when the engine is run.
To remove and to fit the turbocharger
Refer the Workshop Manual for details of how to remove and to fit the turbocharger.
How to inspect the battery charging alternator
Inspect the battery charging alternator, for loose connections. Inspect the ammeter (if fitted) during engine
operation to ensure correct battery performance and/or correct performance of the electrical system. Clean the
outside of the alternator and ensure that the ventilation holes are clear.
The alternator must be checked and corrected, if necessary, by a person who has had the correct training, at
the periods given in the service schedule.
46
User’s Handbook, TSD3454E, Issue 2
This document is printed from SPI². Not for RESALE
![]()
![]()
4
2300 Series
How to inspect the starter motor
Check the electrical connections of the starter motor assembly and clean them. Check the starter motor for
correct operation.
The starter motor must be checked and corrected, if necessary, by a person who has had the correct training,
at the periods given in the service schedule.
How to inspect the coolant pump
Inspect the coolant pump for leaks. If leakage is observed, renew the coolant pump seal or the coolant pump
assembly. Refer to the Workshop Manual for the dismantle and assembly procedures.
Refer to the Workshop Manual or consult your Perkins dealer if any repair or replacement is needed.
Notes:
A small amount of leakage of coolant across the surface of the face seal in the water pump is normal. Its
purpose is to provide lubrication for the seal.
There is a hole in the water pump body to allow coolant to drain. Small amounts of coolant might be seen
to leak intermittently from the drain hole during the engine operation cycle.
Signs of a small leakage through the drain hole are not an indication that the pump is faulty. Coolant stains
or intermittent drops of coolant from the hole, indicate normal operation of the pump.
User’s Handbook, TSD3454E, Issue 2
47
This document is printed from SPI². Not for RESALE
![]()
![]()
![]()
![]()
![]()
4
2300 Series
How to eliminate air from the fuel system
This procedure is used normally when the engine runs out of fuel.
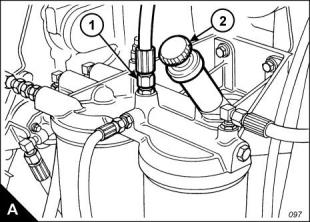
1 Loosen the union of the fuel return pipe (A1). Unlock and operate the hand priming pump (A2) until fuel, free
from air, flows from the union; this procedure will require many strokes of the pump. Use a cloth or a container
to collect the excess fuel.
2 Tighten the union (A1). Operate the hand priming pump until a strong pressure is felt on the pump. Push the
priming pump plunger inward. Tighten the plunger by hand and continue immediately with the next stage.
3 Start the engine.
Caution: Do not crank the engine continuously for more than 30 seconds. Allow the starter motor to cool for
two minutes before the engine is cranked again.
4 If the engine will not start, allow the starter motor to cool for 2 minutes. Repeat steps 1 and 2 to start the
engine. Continue to eliminate air from the fuel system if:
The engine starts, but runs unevenly.
The engine starts, but continues to misfire or smoke.
5 Run the engine with no load until it runs smoothly.
48
User’s Handbook, TSD3454E, Issue 2
This document is printed from SPI². Not for RESALE
![]()
![]()
![]()
![]()
2300 Series
5
Engine fluids
5
Fuel specification
Diesel fuel must conform to one of these specifications:
ASTM D975 No 1-D or No 2-D
BS 2869: Part 2 1998 Class A2
BS EN 590 1997
General fuel requirements are: Maximum sulphur content 0.2%; minimum Cetane number 45.
Fuel cleanliness
The modern, high pressure fuel injection system used on the 2300 Series engine requires a high level of fuel
cleanliness to ensure correct operation and reliability.
The fuel must conform to all aspects of the ASTM D975 specification, but in particular to the requirement for
number 2-D to have less than 0.05% water and sediment. The fuel should also be free from biological growth.
If biological growth is suspected, contact Perkins to discuss a suitable measurement and course of action. For
long term storage of fuel, the recommendations given in ASTM D975 must be followed where appropriate.
The use of fuels which do not conform to the above standards can cause: difficulty with starting, poor
combustion, deposits in the fuel injectors or combustion chamber, reduced service life of the fuel system and
filters, reduced engine life and could affect the warranty. Further details can be obtained from the Service
Department at Perkins Engines Company Limited, Shrewsbury.
Coolant
Coolant mixture
The coolant approved for use in 2300 Series engines is a mixture of 50% heavy duty, commercially available,
ethylene glycol antifreeze and 50% clean soft water. The antifreeze must meet ASTM D5345 or ASTM D4985
specifications.
A 50/50 ethylene glycol antifreeze mixture gives protection against freezing down to -35 °C. A 60% glycol mix
gives protection down to -40 °C and should be used for Arctic conditions.
Propylene glycol antifreeze is an acceptable alternative to ethylene glycol but only in 50/50 mixture strength,
at which it will protect against freezing down to -29 °C.
Caution: Mixtures containing methanol are not approved.
If anti-freeze is not available, and the ambient temperature is not expected to fall below 10 °C, then clean soft
water, with 1% of Perkins corrosion inhibitor (part number 21825 735 - 1 litre), may be used. This ratio is
equivalent to 0,5 litres of corrosion inhibitor to 50 litres (11 UK gallons) of water. The use of this product should
be controlled in accordance with the manufacturer’s instructions.
Water quality
Soft water means de-ionised water, distilled water, rain water or water from a mains supply which has the
following requirements:
Chlorides - 40 mg/l max, sulphates - 100 mg/l max, total hardness 170 mg/l max, total solids 340 mg/l max and
pH of 5.5 to 9.0.
If in doubt consult the local water treatment and supply company.
If soft water is not used, the coolant system may be affected by the formation of hard deposits which can cause
the engine to overheat. This is especially important for engines which have coolant added frequently.
User’s Handbook, TSD3454E, Issue 2
49
This document is printed from SPI². Not for RESALE
![]()
![]()
5
2300 Series
The use of products which are not approved for the coolant system may cause serious problems. Coolant
mixtures with insufficient corrosion inhibitor can cause erosion and/or corrosion of coolant system
components.
Lubricating oil specification
The lubricating oil used in the 2306 engine must be a 15W40 oil which conforms to the API CG-4 specification
as a minimum. Oil produced to the higher specification, API CH-4, has greater soot handling capability and
wear resistance leading to longer service intervals and/or engine life.
The recommendation is therefore API CG-4 acceptable oil and API CH-4 preferred oil.
Oil change period is 500 hours where fuel sulphur is less than 0.2%. Use of fuels having a higher sulphur level
than this will reduce the oil life, which will have to be determined by oil analysis conducted by the customer
and a reputable analysis service.
Warranty
The engine must be operated with the approved fuel, lubricant and coolant, and maintained in accordance with
the service schedule or the warranty can become invalid.
50
User’s Handbook, TSD3454E, Issue 2
This document is printed from SPI². Not for RESALE
![]()
![]()
2300 Series
6
Fault diagnosis
6
Problems and possible causes
Possible causes
Problem
Checks by the workshop
personnel
Checks by the user
The starter motor turns the engine too slowly
The engine does not start
1, 2, 3, 4
5, 6, 7, 8, 9, 10, 12, 13,
14, 15, 17
34, 35, 36, 37, 38, 42, 43, 67
5, 7, 8, 9, 10, 11, 12, 13, 34, 36, 37, 38, 40, 42, 43, 44,
The engine is difficult to start
Not enough power
Misfire
14, 15, 16, 17, 19
67
8, 9, 10, 11, 12, 13, 16,
8, 9, 20, 21
34, 36, 37, 38, 39, 42, 43, 44,
63, 64, 66, 67
8, 9, 10, 12, 13, 15, 20,
22
34, 36, 37, 38, 39, 40, 41, 43,
67
11, 13, 15, 17, 18, 19,
23, 22
34, 36, 37, 38, 39, 40, 42, 43,
44, 63
High fuel consumption
Black exhaust smoke
34, 36, 37, 38, 39, 40, 42, 43,
44, 63, 64, 67
11, 13, 15, 17, 19, 21, 22
36, 37, 38, 39, 42, 44, 45, 52,
58, 61, 62
Blue or white exhaust smoke
4, 15, 21, 23
The pressure of the lubricating oil system is too low
The engine knocks
4, 24, 25, 26
46, 47, 48, 50, 51, 59,
36, 37, 40, 42, 44, 46, 52, 53,
60
9, 13, 15, 17, 20, 22, 23
8, 9, 10, 11, 12, 13, 15,
16, 18, 20, 22, 23
The engine runs erratically
34, 38, 40, 41, 44, 52, 60, 67
34, 38, 39, 40, 41, 44, 52, 54,
67
Vibration
13, 18, 20, 27, 28
The pressure of the lubricating oil system is too high
The engine oil temperature is too high
Crankcase pressure
4, 25
49
11, 13, 15, 19, 27, 29,
30, 32, 65
34, 36, 37, 39, 52, 55, 56, 57,
66
31, 33
39, 42, 44, 45, 52, 61
37, 39, 40, 42, 43, 44, 45, 53,
60
Bad compression
11, 22
The engine starts and stops
10, 11, 12
67
User’s Handbook, TSD3454E, Issue 2
51
This document is printed from SPI². Not for RESALE
![]()
![]()

6
2300 Series
List of possible causes
1 Battery capacity low.
2 Bad electrical connections.
3 Fault in starter motor.
4 Wrong grade of lubricating oil.
5 Starter motor turns engine too slowly.
6 Fuel tank empty.
7 Fault in stop control.
8 Restriction in a fuel pipe.
9 Fault in fuel lift pump.
10 Dirty fuel filter element.
11 Restriction in air induction system.
12 Air in fuel system.
13 Fault in fuel injectors or fuel injectors of an incorrect type.
14 Cold start system used incorrectly.
15 Fault in cold start system.
16 Restriction in fuel tank vent.
17 Wrong type or grade of fuel used.
18 Restricted movement of engine speed control (not applicable to 2300 series engines).
19 Restriction in exhaust pipe.
20 Engine temperature is too high.
21 Engine temperature is too low.
22 Incorrect valve tip clearances.
23 Too much oil or oil of the wrong type is used in wet type air cleaner, if one is fitted.
24 Not enough lubricating oil in sump.
25 Defective gauge.
26 Dirty lubricating oil filter element.
27 Fan damaged.
28 Fault in engine mounting or flywheel housing.
29 Too much lubricating oil in sump.
30 Restriction in air or water passages of radiator.
31 Restriction in breather pipe.
32 Insufficient coolant in system.
33 Vacuum pipe leak or fault in exhauster (not applicable to 2300 series engines).
34 Fault in fuel injection pump.
35 Broken drive on fuel injection pump.
36 Timing of fuel injection pump incorrect.
37 Valve timing is incorrect.
38 Bad compression.
39 Cylinder head gasket leaks.
40 Valves are not free.
41 Wrong high-pressure pipes (not applicable to 2300 series engines).
42 Worn cylinder bores.
43 Leakage between valves and seats.
Continued
52
User’s Handbook, TSD3454E, Issue 2
This document is printed from SPI². Not for RESALE
![]()
![]()
6
2300 Series
44 Piston rings are not free or they are worn or broken.
45 Valve stems and/or guides are worn.
46 Crankshaft bearings are worn or damaged.
47 Lubricating oil pump is worn.
48 Relief valve does not close.
49 Relief valve does not open.
50 Relief valve spring is broken.
51 Fault in suction pipe of lubricating oil pump.
52 Piston is damaged.
53 Piston height is incorrect.
54 Flywheel housing or flywheel is not aligned correctly.
55 Fault in thermostat or thermostat is of an incorrect type.
56 Restriction in coolant passages.
57 Fault in water pump.
58 Valve stem seal is damaged.
59 Restriction in sump strainer.
60 Valve spring is broken.
61 Turbocharger impeller is damaged or dirty.
62 Lubricating oil seal of turbocharger leaks.
63 Induction system leaks.
64 Turbocharger impeller is damaged or dirty.
65 Drive belt for water pump is loose.
66 Induction system leaks (turbocharged engines).
67 Faulty engine management system
User’s Handbook, TSD3454E, Issue 2
53
This document is printed from SPI². Not for RESALE
![]()
![]()
專業(yè)維修鉑金斯發(fā)動機,專業(yè)維修鉑金斯發(fā)動機技術(shù)支持,專業(yè)維修鉑金斯發(fā)動機價格規(guī)格資料查詢,專業(yè)維修鉑金斯發(fā)動機哪里有,專業(yè)維修鉑金斯發(fā)動機多少錢,專業(yè)維修鉑金斯發(fā)動機聯(lián)系電話,湖南、長沙、常德、郴州、衡陽、懷化、婁底、邵陽、湘潭、湘西、益陽、永州、岳陽、張家界、杭州/紹興、湖州、嘉興、寧波、舟山、臺州、金華、麗水、衢州、溫州
